Tres Leches Cake

Delicious for any occasion

Homemade Watercolors

For homeschoolers, or just fun at home

DIY Toothpaste

Great for good health, and a happy pocketbook

Vegetarian Meals for the Whole Family

Even picky kids will love these meat-less dishes

Sewing Projects and Tips

Even more tutorials to come soon

Wednesday, November 30, 2011

Holidays on a Budget: Advent Paper Chain

Advent calendars are used in many households. I remember my Grandma bringing one candy-filled, beautifully illustrated calendar for each of us every year. She always bought them at the Exchange, and they were filled with tiny, delicious German chocolates. Mmmmmm.

Having a little one around, we've opted for a more visual countdown to Christmas, a paper chain. Easy to make, colorful, and economical. You can have each of the children make a chain for themselves, or like us, have one larger chain displayed. This year, instead of stapling our chain to the wall, I've made it look more like an intentional decoration. I whipped together an adorable "holder", that the chains can be hung on year after year, and gives them a bit of a more finished look.

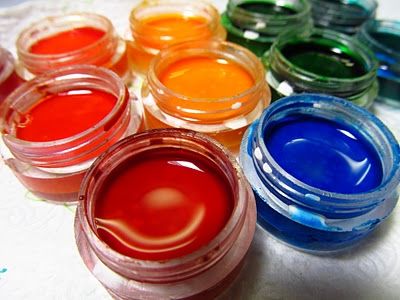
First, I cut 3 bell shapes out of some thin cardboard. I used an empty cereal box. Recycling! Then I spray painted them with some gold paint. I only did the edges of the back two, and only just in case they peeked from behind the top layer. You can paint the brown, papery side for a flocked looking bell, and the smooth side that was the outside of the box for a shinier bell.
Then, I simply glued the layers together. Three seemed to be the perfect strength, as well as gave me the perfect arrangement for my ribbons. I hung one shorter length between the bottom and middle layers at the top. This was my hanging ribbon. Then, between the middle and the top layers, at the bottom, I glued a longer ribbon that the last link in the paper can be thread through before stapling shut. Placing the ribbons on different layers kept the cardboard from having a big gap, or big bulges.


Tuesday, November 22, 2011

Pecan Pie

Recipe time again. Tonight I'm going to share with you our pecan pie, a favorite for Thanksgiving and any other special occasions. I've even been asked to make this instead of a birthday cake!

You will need:
  • 3 eggs
  • 1 C brown sugar. (The secret to a rich, crusty pie.)
  • 1 C corn syrup. (The kind of corn syrup you use in your kitchen is not the same thing as HFCS, calm down. ;-) )
  • 2 Tablespoons butter, melted. (NOT margarine, pie is not a time to count calories!)
  • 1 teaspoon vanilla
  • 1/4 teaspoon salt
  • 2 C total pecans, I like pieces because it will cut neater, but feel free to use whole for presentation if you wish. 
Pre-heat oven to 350.
In a large mixing bowl, beat your 3 eggs. Then, mix in- in this order, the sugar, corn syrup, butter, vanilla, salt.
Fold in 1 1/2 C of pecans. Dump into your crust. TOP with the remaining 1/2 C pecans.

Bake for 1 hour, or until the center is juuuust set. If you need to, cover the edges of the crust with foil if they brown too fast.

That's it, super easy, super delicious pecan pie!

Daughter moves to "big city"

Guest post written by my buddy Aldo Mays
My daughter is moving into the big city. Well, the South’s big city. Being from the rural part of Georgia, Atlanta feels like the biggest city in the world. Obviously there are a lot of bigger cities, but this is the biggest one close to my family. I am surprised she wanted to move there. In the country, there is always a feeling of peace and I have never felt in danger. The city seems like a completely different feel. I am worried about my daughter’s Atlanta Home Security. I worry about her house getting broken into or her coming home and someone being in the house. I am not a fan of this move and I am losing sleep over it. My little girl means the world to me and even though she is a grown adult and can make her own decisions, she will always be my little girl. I have always been there to protect her and now I am far away and helpless. I just wish she would not move there and I just wish she would stay close to home.

Monday, November 21, 2011

Liven Things Up With Houseplants

Like so many homes during this gloomy-weather time of year, the Disheveled Household needs some livening up. What better way to brighten a room, or a whole house, than with house plants? A house plant can keep a little green, or a bit of color in your house when the skies outside are grey. The wind has ripped all the colorful leaves off the trees here already, so I was thinking bringing some colored plants inside would be nice. It'd also be a great way to keep your green thumb in shape while there's no plant tending to be done outside.

When choosing a houseplant,  It is important to consider a lot of the same things you would when choosing a plant that will go outside.  Your watering, location in the home you will put the plant, light, etc. You should always consult the plant's tagged information, the nursery/store employees, or do some research online, with an online plant guide. That is especially helpful if you live rural, like me, and are planning on possibly buying your plants online. I love the online option, not only for the convenience, but the wider variety it offers me. Many times you can find some very interesting plants that will thrive in your house that you just won't see locally.


Saturday, November 19, 2011

Shout-Out Saturday: The Mama of Mojo

This week, hop on over and visit my dear friend Kayla at The Mama of Mojo. From her make-up posts, to her updates on her ADORABLE boys, Kayla rocks my socks!


The Mama of Mojo

Thursday, November 17, 2011

Thawing Out Your Turkey

Here's a handy chart for approximate thawing times for turkey, by pound.
This is just a jumping off point, every bird, and refrigerator is different, and your times may slightly vary.
 
Times approximate

Remember to always store/thaw your raw meats on the bottom-most shelf, and in a protective container to prevent cross-contamination.


Wednesday, November 16, 2011

Pumpkin Pie Spice

Tonight is when I take stock of everything I need for Thanksgiving in the pantry, so I can go to the store tomorrow and stock up on non-perishables. One thing I need, but DON'T buy is pumpkin pie spice. I use this delicious mix:


  • 3 Tablespoons ground cinnamon
  • 2 teaspoons ground nutmeg
  • 2 teaspoons ground ginger
  • 1 1/2 teaspoon ground cloves
  • 1 teaspoon allspice
Whisk together with a fork and store in a small jar. 

Sunday, November 13, 2011

Craft Tutorial: T-shirt Infinity Scarf

Infinity scarfs are cute, versatile, and easily adapted to wear the ways you like. Even as a necklace! Here's how to throw one together, I made one for myself from one of Hubby's old torn up shirts, as well as one for The Princess from one of big brother's shirts WHILE I made dinner.

First grab your shirt. I totally didn't think about picture taking until I was a bit through the process, but you know what it looks like to grab a shirt. =-D You will want a soft t-shirt WITHOUT seams on the sides. It doesn't have to be a thick one either, thin under-shirts work just as well, as long as they have seam-less sides.

You are going to want to cut off the hem of the shirt, then chop it off about where the sleeves meet the trunk. The one I used from Hubby has a big hole that went a little below that, but cutting it that inch or so shorter didn't seem to matter.

Then, you are going to want to cut slits, going around the shirt horizontally, across your belly if you were wearing it. BUT leave a 1/2-3/4 inch space of material. Like this:


Now, you want to hold that nice, uncut, sturdy bit in your hand and grab the looped strands with the other hand. Slowly, but firmly stretch the strands until they curl up into themselves. They will start to look quite lovely.

Now, we're going to want to do something about that sturdy bit holding it together. Get a needle and a fair amount of thread. If you have cheap needles and/or already tender fingertips, grab some pliers too- it helps with the layers! I was lazy, and used the dark thread that was already out, but it was ok because it wasn't seen by the end.

You're going to want to weave your needle in and out and do a rough running-stitch through the length of the uncut portion. Neatness doesn't matter, you're just wanting to tack this all together, and gather it up.
Pull and gather it all up. Turn your needle about and go through again, from the opposite side, then again from the first side for good measure.
I also ran the thread around my bunch before I tied it off.
These are all the same shirt...just sucky lighting


Next, take a scrap of your shirt, and cut off a 1 inch x 1 1/2-2 inch rectangle. Neatness doesn't matter. Length doesn't matter much, because you won't need it all, but that extra bit makes it easier to hold while you get it attached. You'll cut the extra off. Stretch this rectangle a bit to get it to start to curl, it will help it look tidier. Stitch it to your bunched up part to cover it, much like a bow.
Ignore the flower you see peeking out until the next step ;-)
This one is left plain

You can leave it like this, use it as a spot to add a broach, or other bit of decoration, or you can make and sew on a super-cute flower like this: 

Take some of your t-shirt, and draw/cut out some simple flower shapes. I folder my material over so I had two of each size, small, medium, and large. I also cut out one tiny set of petals.
Next, you need to stack them all up, largest on the bottom. You can also give these a tiny bit of stretch to make them curl a bit.
Tack them together with a tiny X, but before tying off your thread, add a lovely little bead. Mine is nothing fancy, it is from a pack I found in the dollar bin at Dollar General. I also found it easier to STILL not tie-off and just sew the flower to the scarf now.


Saturday, November 12, 2011

Shout-out Saturday

This week I want to send a special shout-out to Kim, at One Nutty Mama.
We originally "met" because of Farmville, and she quickly became one of my most favorite mommy-blogger buddies! A real sweetheart, with adorable kiddos. She also sells Scentsy, and is the reason for my love of it! =-D


Thursday, November 10, 2011

C & H 1001 Cookie Starter

I came across  this C & H website on one of my coupons recently. http://www.chsugar.com/cookiestarter/
What a great time saving idea, or for spur-of-the moment cookies!

They also have a Facebook, so fans can help them reach that 1001 recipes. There are 17 on the site to get you started though, so I think I'll whip up a batch of starter for my boys to experiment with!

Wednesday, November 9, 2011

Easy-Peasy Decorating

Lately I've been seeing spray-painted jars for decorating crop up all over the place. And then, someone had the great idea to spray the INSIDES of the jars for a more polished look. I wanted to try this out, but also wanted a jar or two that I could use for multiple decorating uses. I decided to paint mine gold. Perfect for Autumn decorating, and can seamlessly move on into Christmas, then maybe even Valentine's and St. Patrick's with the right accessories.

I carefully, and very lightly, sprayed coats into my recycled pasta-sauce jar. I think I did about 3 or 4. VERY light ones.
I can't wait to try this with other shape/size jars and different colors!

Monday, November 7, 2011

Homemade Cocoa Mix

We've adapted the "Hot Cocoa Mix" from HillbillyHousewife.com, and it is delicious, and handy to have this time of year.

The directions call for whisking together everything in a bowl, but I find my method dissolves much easier.

What you will need:

  • 4 cups instant milk
  • 2 cups of sugar (I also make a version for Hubby with Splenda...)
  • 1 cup powdered creamer
  • 1 cup cocoa powder (the kind used in baking)
  • 1 box INSTANT vanilla pudding. It provides great flavor, and it has an additive that makes your mix dissolve easier. (I use a sugar-free box for Hubby's Splenda mix...)
First, dump 2 cups of the milk, and 1 cup of the sugar into a food processor. Whirl and pulse until the milk is very fine. This helps in the mix dissolving, and makes the dry mix look really nice. Gift-giving nice! Dump this first batch into a large mixing bowl, and repeat with the second half of the milk and sugar. If you have a large enough food processor, you can do it all at once...but I have a large one & I still cannot. Whisk in the rest of the ingredients. Then whisk longer. Make sure it is mixed VERY, very well.
Store in a cool, dry place, preferably in an airtight container. I store part of mine in an empty creamer container for easy use, then refill from my airtight one. =-)

To use, a plop a couple big,. heaping spoonfuls into a mug and add boiling water. It is probably about 1/4 cup mix. The original recipe says to use 1/3, but my mix is finer. I also like a spoonful or two in a cup of coffee, YUM!

Sunday, November 6, 2011

Thankful Tree

My friend Shannon posted on her Facebook something she was doing with her brood. She's a home-schooler of many, and always has the best ideas. I told her I was going to steal this one!

We made a rough trunk out of recycling the brown paper that comes in the boxes that were shipped to us. We live ruraly, and order things we can't get locally, which is a lot. I save the paper for arts & crafts.

I wanted it to stay pretty well, but we rent so I couldn't use anything TOO semi-permanent... but masking tape carefully placed did just the trick.

We cut out leaf shapes in Autumn colors, and everyone's been writing what they're thankful for every evening, until Thanksgiving.

Our little Thankful Tree will grow and grow!

(& yes, as my smarty-pants tween pointed out, the leaves are falling ON TO the tree while the ones outside are falling off.... hahaha!)

Friday, November 4, 2011

A Special Shout-out For a Sweet Mommy

My dear friend Stephine has a blog I'd like to share with you. DearSilas.org is dedicated to the loss and memory of her little angel, as well as the long road to healing her broken heart.


Dear Silas


It was also going to be a bit of a TTC blog, with big brother Silas helping along the way, but Stephine just surprisingly, but excitedly announced they are expecting!

Thursday, November 3, 2011

Make Your Own Taco Seasoning Mix

Still waiting on my cord (of course...) so today here's a quick mix for homemade taco seasoning.
Whisk in a bowl:

  • 1 Tablespoon dried minced onion
  • 1 Tablespoon ground cumin. (Here at the DisheveledHousehold, we're cumin lovers, so I use 2) 
  • 1 teaspoon salt
  • 2 teaspoons chili powder, or to taste.
  • 1 teaspoon garlic powder
  • 1 teaspoon onion powder
  • 1 teaspoon paprika
  • 1 teaspoon cornstarch
  • 1/4 teaspoon lemon pepper seasoning
  • 1/4 teaspoon ground coriander
Delicious! 

Wednesday, November 2, 2011

NaBloPoMo 2011 Is Off to a Rocky Start

Ok, a crappy start. =-(

I had some really pretty pictures, of some really pretty Autumn decorations on my laptop...but you know...my plug decided to quit working. The little-black-box-thingie decided it was done. D-O-N-E done.
We looked it up while trying to find one to order, and apparently this model kinda just goes when it gets older. Many people who own this laptop are on their 2nd-4th plug. Thanks Gateway. =-/

Thank goodness for Hubby's computer, his know-how, and the smarts to order me one as a customer of his company. I didn't think of that while I was freaking out about my lack of funds. Yay him. =-D So hopefully soon. (3-5 business days...) I will be back 100%- with pictures! Untill then, it'll be quick-tips, and whining about my computer. Whine, whine, whine....
Waaaait...I'm officially his client now, right? Can I complain if it takes too long? ;-)

Ok, so let me leave you with a quick-tip from this time last year. Probably my favorite, and most used tip ever. (I'm clumsy!)
Cleaning up a dropped egg.

Tuesday, November 1, 2011

NaBloPoMo 2011

National Blog Posting Month is once again here. It begins slow and easy, with a cuppa on a lovely afternoon. Here we are recuperating from having Halloween on a school night and preparing for a possible Autumn snowstorm. Many of you are still stuck in the mess of a Nor'Easter snow storm last week. One of my closest friends is still without power, and freezing her buns off. Lots of warm thoughts go out to all of you, and wishes for power to return quickly. [For those of you charging phones and laptops in your cars like she is...the rest of you will see this later ;-)]

This Halloween we had a Ringwraith, a zombie (who stayed in character, it was adorable!), and a "sc-awy ghost", who loved to announce to everyone, and anyone what she was. She also wouldn't say "Trick-or-treat" for nothin'. But a sing-songy "thank you" melted everyone's hearts.

A corn-starch face is gentle on Eczema =-)
Homemade blood ALWAYS works best
He's gonna get that Hobbit ;-)
We only went to a handful of house, having a just-potty-trained little one made us nervous, and no one seemed to mind anyways. I think school wore them out. Plus we've been snacking on homemade treats all weekend, so the candy wasn't as lusted for.
There were also chocolate covered ones...and cookies!
Now we're settling down, waiting for the good moisture to come, and planning for our Thanksgiving festivities. Yeah, we love to eat here.