Tres Leches Cake

Delicious for any occasion

Homemade Watercolors

For homeschoolers, or just fun at home

DIY Toothpaste

Great for good health, and a happy pocketbook

Vegetarian Meals for the Whole Family

Even picky kids will love these meat-less dishes

Sewing Projects and Tips

Even more tutorials to come soon

Showing posts with label Holidays. Show all posts

Saturday, November 23, 2013

Make-Ahead Thanksgiving- Dishes That Freeze Well

You can save time in the kitchen this Thanksgiving by making some of your dishes ahead. And, if you have the room for them, even make them well in advance and freeze them.

These dishes freeze well, and you won't lose any texture or flavor:

  • Dressing/Stuffing
  • Sweet potatoes if they are mashed or in casserole form
  • Mashed potatoes if you use plenty of cream and butter
  • Corn casseroles
  • Squash casseroles
  • Yeast breads and rolls
  • Gravy 
  • Cookies
  • Fruit pies (not pumpkin)- assemble, but do not bake prior to freezing. Pies may be baked from frozen state (just add a bit of extra time.)
You may be tempted to freeze the kind of pies that you can buy in the supermarket frozen- but remember, those factory-made pies have added stabilizers to make them freeze-able. That's something the home-cook cannot replicate. 

To use, simply defrost in the refrigerator (except cookies and breads!) and warm in the oven. 

Saturday, October 26, 2013

The Easiest Mock Butterbeer Recipe Ever


We still love the Harry Potter franchise over here at the Disheveled household. And every Halloween we try new recipes of the delicious and magical foods found in the books and movies. This year, I wanted to develop a simple butterbeer, that can be doubled or tripled as needed, tasted yummy, and didn't require me going to the city to get butterscotch sauce. (Which was in the former easiest recipe I had found.) I worked out one that passed the picky Potterhead taste test, (x3), and to boot- if you use diet soda, can be carb-free!

Here it is...
so easy...

Mix together:

  • 2 12oz cans of cream soda (or diet cream soda)
  • 1/4 tsp imitation butter flavoring (we use Watkin's)
  • 2 drops of caramel flavoring
  • 1 1/2 teaspoons of heavy cream
Just mix it. Pour it. Drink it.
Makes about 4 servings. Two if they're huge.

Feel free to share with a link! Here's a Pinterest image :)

Tuesday, October 22, 2013

Homemade Fake Blood For Halloween


In a pinch, or if you don't want to spend money on a tiny tube of the stuff, fake blood can easily be made at home with every day ingredients. This recipe can be used safely on the face, on cloth (I've always used clothes I was going to throw away for bloody costumes...) or anywhere you can wash up.


You will need:

  • 1 cup plain/light corn syrup
  • red food coloring
  • blue food coloring
  • and if wanted for an old/not fresh blood look, green food coloring
  • 1 Tablespoon cornstarch
In a bowl, or a jar (I use a jar so I can just toss on a lid and store), put your corn syrup and 40-50 drops of red food coloring. If using gel coloring, or wanting to adjust your color feel free to experiment.
 This step will give you a cherry-red color, not at all how blood looks.
This is where the blue comes in. Add a SINGLE drop of blue food coloring, and mix thoroughly.
Much better. Looks VERY dark in the jar, but if you get some out you will see it is still red, and not as purple as it seems.
But it looks a little too see-through, so that is where the corn starch comes in. Add one tablespoon and mix like crazy. Now you have cheap, slowly dripping, chemical-less fake blood.

Feel free to experiment, not everyone's drop are the same and you may want yours to have a different look. Also, if you want a more less fresh, old blood look, (getting brown...), simply add 3-5 drops of green food coloring.

Feel free to pin on Pinterest, and share freely on Facebook, etc.


Wednesday, September 4, 2013

Shanah Tovah! Moist Honey Apple Cake


Our house LOVES this cake, not just for holidays, but pretty much all autumn and winter long. Not overly sweet, dry or spiced, this cake is a perfectly rounded honey cake with just enough apple-goodness.

Preheat your oven to 325 degrees and spray a NON STICK bundt pan with a release. I use an olive oil one with great results. (A non stick is very important because of all the honey in the batter.)

You will need:
  • 3 eggs
  • 1 cup of honey
  • 3/4 cup light brown sugar
  • 1 cup oil (a light oil)
  • 1 teaspoon of vanilla extract
  • 3 cups of flour (I use 2 AP, and one wheat- very delicious!)
  • 1 teaspoon baking powder
  • 1 teaspoon baking soda
  • 1/4 teaspoon salt 
  • 2 teaspoons cinnamon
  • 1/4 teaspoon nutmeg
  • pinch of ground ginger
  • 4-6 apples of choice, pealed and grated. (I zip them through the grater on my food processor. It makes them uniform, and doesn't give them time to brown.) You can use any apples you like, this isn't a pie where you need firm pieces, so if they cook down into the batter it doesn't hurt it.
and for the glaze:
  • 1 cup powdered sugar 
  • 1 tablespoon, or slightly less,  almond milk or your choice of dairy substitute. (or milk if you're not making it kosher!)
  • splash of vanilla extract
In a large mixing bowl beat your eggs until they are creamy-yellow and a bit foamy. Beat in your honey until fully incorporated. Then you can easily beat in your brown sugar, oil, and vanilla extract. 

Over the top of the mixture, SIFT the remaining DRY ingredients. Stir until mixed. Fold in your apples. Depending on the size of your apples, you will have about 4-5 cups of gratings. 


Spread the thick batter into your prepared bundt pan. Bake for around 70 minutes before checking. A skewer into the middle of the ring will come out clean, and the sides of the cake should shrink slightly away from the edges of the pan. It may take up to 90 minutes, this is a very moist cake.

Let cook in the pan for about 10 minutes to help with releasing without breakage. Then turn over onto a plate, platter or rack to continue to cool thoroughly. It make take a couple hours because of the density.


To make the glaze, mix your splash of vanilla and about 1/2 of a tablespoon of your milk/substitute. Incorporate as  much as you can before adding more liquid splash-by-splash until the right consistency. You'll want it pretty thick, about like honey. Drizzle onto the cake. You can just use a fork, or pipe it on with a bag. Let dry before cutting.

Wednesday, May 2, 2012

My Favorite Decorating Icing

I recently started working on my cake decorating again, just for fun, after The Princess wanted a flower covered birthday cake. Boy was I out of practice! I tried several icing recipes, but I hit gold when I made my own little changes to one of Wilton's buttercreams.

Here's what I used:
  • 1/2 C Crisco shortening
  • 1/2 C (1 stick) real butter, unsalted
  • 1 tsp vanilla extract
  • 1/2 tsp Watkin's butter-flavored extract
  • about 4 C powdered sugar, a little more on hand if you'd like some icing stiffer.
  • 2 Tbs half & half, a tiny bit on hand if you'd like to thin some icing for spreading. 
I separated the generous amount (about 3 cups) into small cups for coloring, keeping much of it for icing the cake. I thinned the spreading icing with a few more drops of half & half. I also added a tiny spoon of powdered sugar to the frosting used for the roses. I affixed wax paper squares to my flower nail with a dab of frosting, to quickly form tons of roses while letting them all dry before placing on the cake. Just carefully pull off and put on a new square and go again. (This was SUPER helpful when practicing!)

This Tinker Bell cake was MUCH more feminine than The Jedi's Hobbit Hole cake!

Tuesday, March 13, 2012

Wine Shopping Made Easy

(Click to enlarge)


Spring is here! And warmer weather is just around the corner, and with it more social and family activities. Barbecues, reunions, even Easter dinner, Spring time is a great time to share the gift of wine. Wine.com makes it easy to shop for wines by price, by rating, style, or even occasion. They also have a variety of wine clubs to choose from if you want to be adventurous and try a couple new wines a month. Can't make an event? Send a bottle of wine or a gift basket in your place. The recipient will be touched you thought of them.


Saturday, January 7, 2012

Another Cute Find + a Mini Giveaway

Remember when I blogged about finding some super cute shaped ice cube trays at Halloween time? This week I found another cute tray at Dollar General. Just in time for Valentine's day!
I got three...two for making ice...and one for crafts. They were a buck each, niiiice.

My first craft.....
Crayons!
I used my microwave to melt my crayon bits since I'm not really sure these cheapy trays are really silicone....I'd hate to melt them!

Each little "set" has a reds-pinks heart, an oranges-yellows heart, a greens heart, a blues heart, and a purples heart. They're a big hit at my house, and I can't wait to see what else I can make! (I'm thinking soaps!)

Followers of the Disheveled Mommy Facebook page may have noticed a new tab on the page. "Top Fans". Just a cute little way to acknowledge all the little comments and love you leave. This week, since I have an extra set of little heart crayons, I'm gonna pass them on! I'll check the "Top Fans" tab Saturday evening, and the follower who's sitting at #1 will be sent the set! (So, you must be following us on FB to participate...)


Tuesday, December 13, 2011

Holidays on a Budget: Green and Frugal Wrappings

Sometimes being frugal also means being green. When wrapping gifts this year, why not consider these eco and budget friendly ideas?

  • Newspapers. The old stand by. Black and white pages are chic, and comics are cute. 
  • Maps. A great bonus if you use this colorful idea on a gift for someone you've traveled with. Those free maps at state welcome centers are great for this. 
  • Scarves. Look in thrift stores and sales racks for a wrapping that will give twice.
  • Tote bags. They're totally cute and fashionable now-a-days, and the recipient gets a double-gift.
  • Paper bags. Unfold and use as-is, or get creative. The paper is a great canvas for stamps, paints, or even ink drawings. 
  • Fabric. Same idea and wrapping style as the scarves, and thrift stores often have piles of it. What a cute way to wrap a gift for the crafter or seamstress in your life.

Monday, December 12, 2011

Holidays on a Budget: The Perfect Salt Dough

Salt dough ornaments are great not only from a frugal standpoint, but they are a great activity for the kids.
There are many salt dough recipes out there, but this simple one, with no "weird" stuff added works wonders. The secret to a nice, smooth dough is remembering to knead it. Just because it isn't a dough you will be eating, many people overlook this step.

Mix together:
  • 2 cups flour
  • 1 cup table salt
  • 1 cup (give or take a bit as needed) water
Knead until smooth an pliable. Cover and let sit for at least 10 minutes or until ready to use.

Roll to about 1/4th of an inch thick and cut with cookie cutters.
Bake on a parchment-lined baking sheet in a 200 degree oven (lowest setting) for a few hours or until dry. 
Paint, let dry, and glue hangers to the back.

Sunday, December 11, 2011

Holidays on a Budget: Holiday Card Holder

Here is a simple wreath for displaying your holiday cards. You only need a few items to make it, and it makes a great busy project for an older kid.

Begin with cutting an eleven-inch circle from some sturdy cardboard. You will also need a five-inch hole out of the center.
 

Next, cover this in some wrapping paper. Be sure to cut slits or notches in around the edges of the paper so it will cover the curves nicely.

Next, you can paint your clothespins, or cover them with the same paper. A coordinating paper would be nice too. To cover the pins cleanly, apply your glue, and press to the backside of your paper. You'll want to use a piece of paper bigger than your clothespins, and let them dry thoroughly before trimming the paper down. You can also coat with some Modge-Podge or similar coating for protection.
 Arrange your 12 clothespins around your wreath. Secure with hot glue. You can also add some ribbon to the center to make it more wreath-like. (We did...) By the time your pins are filled with cards around the outer edge, the ribbon in the middle will be a nice touch.

Saturday, December 10, 2011

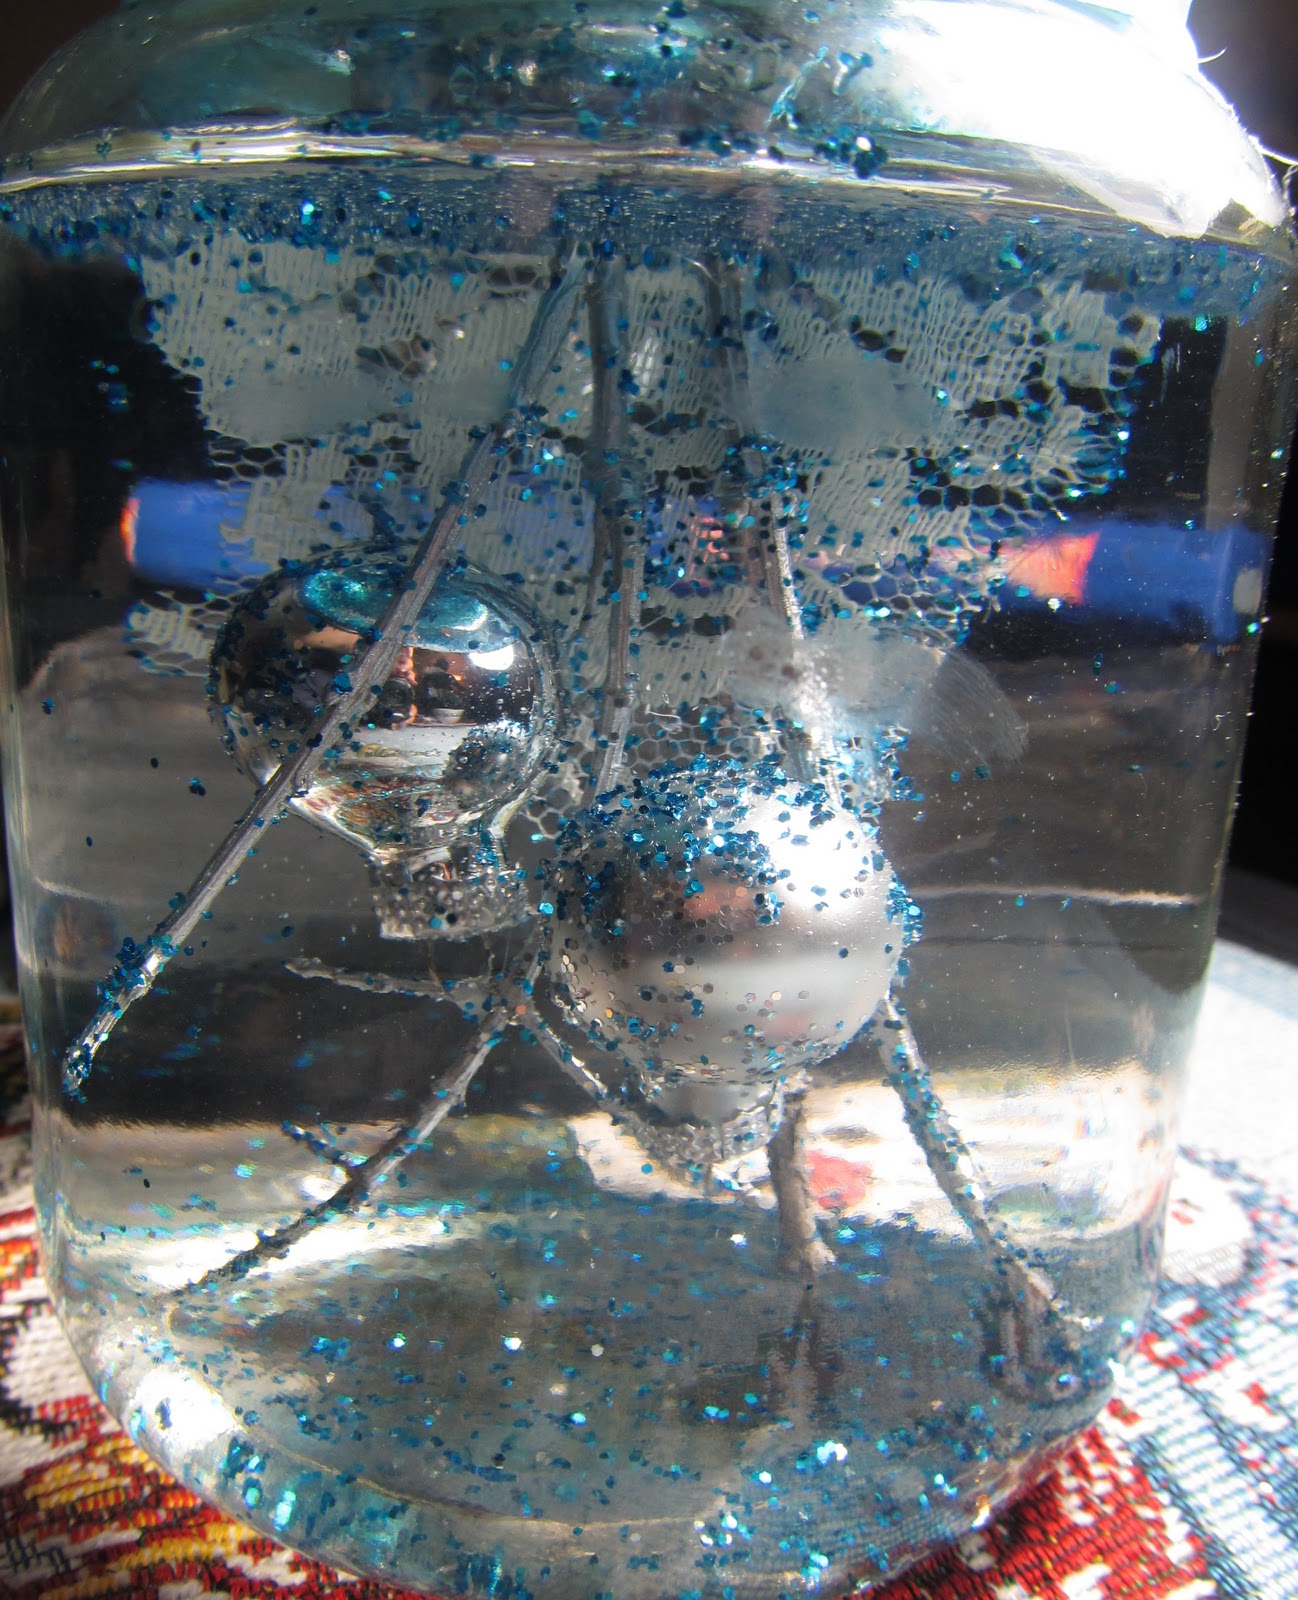
Holidays on a Budget: Bauble Snow-Globes (Anthro-Inspired)

Silver-filled artsy snow-globes are all the rage this year. Simple but blingy, and can be used year-round. Ours don't feature jewelry, but instead good-quality silver spray paint gives trinkets a quirky touch.

First, you'll want to find a jar to use, size and shape is completely up to you. Just be sure to wash thoroughly and remove all traces of label. Don't forget the lid! I also spray painted the inside of the lid- but it was a waste of time, you cannot see it!

Gather your goodies. I saw some globes that had a bit of lace in them, so cute! I sprayed my lace with some clear coat to keep it stiff and in place under the water.I also used some mini-balls, a painted marble, a painted chess piece, and some painted twigs.
Start arranging your baubles on the inside of your lid. I used hot glue. Be sure to secure the bottoms and the tops of your balls so they stay in place when you add them to the jar. Especially the ones you "hang" from the twigs.

Fill your jar almost all the way with water, add a couple drops of glycerine, (optional, but it is supposed to make your glitter float better...) and your glitter of choice. Carefully lower your goodie-covered lid onto the jar. Glue with a waterproof glue before you screw it all the way on. Let cure. (I used a Goop-brand glue)

They even look cute upside down!
You can also cover the lid with some ribbon, it looks super-cute!
One thing is for sure, I need practice photographing them, but they are beautiful in real-life!

Friday, December 9, 2011

Holidays on a Budget: Saltine Toffee

Here is another simple candy to share this Holiday Season.

Only 4 simple ingredients And you can find them all in your pantry, or on hand.

You will need:
  • a little more than 1 sleeve of saltine crackers
  • 1 and 1/2 sticks of butter
  • 1 and 1/2 cups of packed brown sugar
  • 1 package chocolate chips
Line a half-sheet pan with foil and non-stick spray. I also like to add parchment paper, but I keep the foil to protect the sides of the pan. I just got a shiny new pan. I'd like it to stay that way. ;-)

Preheat your oven to 350.

Lay out your crackers.
In a medium saucepan over medium heat, melt together the butter and the brown sugar. Let come to a boil.
Pour over your crackers and smooth out with a spatula.
Bake for 5-7 minutes until the whole thing is bubbling like crazy throughout.

Remove from the oven and let sit for about a minute. Sprinkle with the chips and let sit for another minute.

Spread with an offset spatula.


Chill in your fridge for about 45 minutes or until set. Break into chunks.

Thursday, December 8, 2011

Holidays on a Budget: No Fail "Fudge"

This is seriously the EASIEST candy recipe you will ever see. So tasty, and perfect for a choco-craving or a holiday gift.I like to toss a few pieces in my cookie tin gifts.

You will need
  • 1 bag semi-sweet chocolate chips
  • 1 can sweetened condensed milk (not evaporated milk!)
  • splash of vanilla
  • 4 Tablespoons butter
  • any mix-ins you wish (Nuts, marshmallows, fruits, etc...)
Grease a square glass pan. Have all your ingredients ready. I like to have my butter chopped in little teeny-tiny cubes. I even dump the vanilla with it so it is ready to toss in.

In a double boiler or very carefully in a microwave, melt together the chips and the milk.

Stir in the vanilla, and the bits of butter.

Quickly fold in your mix-ins: I like WELL DRAINED halved maraschino cherries, marshmallows, and chopped almonds- Rocky Road! (What I have pictured is pecans, so my little nut-sensitive one can have some. She doesn't react to pecans =-)

Spread out into your prepared pan, chill until set, and EAT!

Wednesday, December 7, 2011

Holidays on a Budget: Christmas Popcorn Balls

These are an easy, but cheery treat for the Holidays.


Take 1 cup of light corn syrup and 1/2 cup of sugar, bring to hard boil. Add to this 1 small (3 oz.) box of dry Jello powder, in any flavor that is red. Mix very well. Pour over 5 quarts of popped pop corn. This mixture will be VERY VERY HOT. Let cool slightly. After greasing your hands, form balls the size you like, then wrap each one in saran wrap to keep fresh and soft.


Try experimenting with different colors...make some red and green ones...make some blue-raspberry ones for Hanukkah...the possibilities are endless- and yummy!

Tuesday, December 6, 2011

Holidays on a Budget: DIY Plastic Wreaths

Looking for an easy, but time consuming craft to keep the kids busy? Or maybe just one that's durable? Then grab a wire clothes hanger, a couple of white trash bags and some scissors.

Bend (or is it unbend?) your hanger into a circle. Some people like to leave the hook on for hanging, but I clip that sucker off. I also covered the part where I twisted it back together with a little tape so no one would get scratched. I also totally forgot to take a picture of this.

Next, fold your trash bag(s) in half lengthwise until you have a controllable width to cut. Cut into inch-ish sections.
That paint in my thumbnail will just NOT go away!


Then, cut each strip into pieces about six inches long. (I got 8 with each strip.)
Now we'll tie our strips to our wire form. A billion hitch knots... I believe this one is called a Cow Hitch. I'm not sure exactly what words can describe this best, so yay pictures!
Make a U shape, lay under the wire. (You can do this holding it, but I can't hold it and take pictures.)
 Bring your tails up over the wire, and through the loop.
Pull taught, and repeat. Fill your form.
Add some decorations, (yay hot glue!) and you're done. Simple for all your kiddos to do, but will keep them ridiculously busy all afternoon. Lovely.
I'm thinking about trying it with a green cheapy vinyl tablecloth for a green one!